Interlight Script
What this script does is that it will let you interactively change various parameters like intensity, gamma, tint, etc. of each light or self emitting material.
So you can tweak the lighting on you project or you can change drastically the appearance of your project, for example a scene from day to night and anything in between. Of course all this can be animated. It does this by going trough the presets looking at which lights and materials you want to be visible or On for that preset, then it will turn off all other lights as for the materials the self emitting material will get replaced by a regular vray material with what ever the original material had for the diffuse Map.
Once all the presets are finished the script will put back the original materials on each object.
Video Examples:
Demo Video:
Interactive Examples:
Requires: 3DMax 9 – 2014
Version: 1.02
Changes:
ver 1.02 – Max 2011 Support
ver 1.01 – Some Max2010 icon issues.
ver 1.00 – Support for Mental Ray, Final Render and Brazil.
– Export to Java Processing.
ver 0.55 – Initial Release.
General Information:
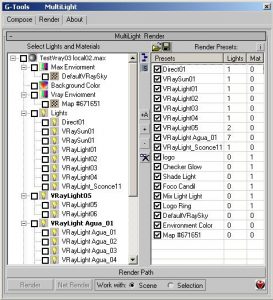
The script consist of 2 sections.
– Render: Here you set up presets in which you can have a single light, material or groups of lights and materials, for instance you can have all the lights of the ceiling on a preset even if they are different types or some are self emitting materials.
You could also choose to make the presets automatically from all you scene lights and materials.
Once you have all your presets you can save this list of presets to file in case you want to come back later or just want to have different scenarios.
Then you Render all these presets or sumit it to the network.
Once it’s done you will end up with a HDRI file per preset.
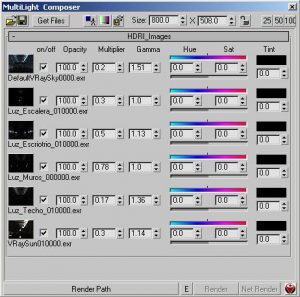
– Composer: here you can compose all those hdri files by loading them and adjust any of the parameters, and animate them as need it.
Once you are done you can render it or submit it to the network.
Of course you can also save this composition in case you want to come back later or have different ones.
Supported Lights and Materials:
Lights:
– All Max Lights
– All Vray Lights
– All Mental Ray Lights
– All Final Render Lights
– All Brazil Lights
Materials:
The following Materials can be use by itself , Inside a MultiSub Material, or inside a Shellac material
Vray:
– VrayLight Material.
– Standard – Self Illum.
Mental Ray:
– Arch & Design.
– Architectural.
– Mental Ray – Glow Lume.
– Standard – Self Illum.
Final Render:
– FR Architectural.
– FR Advanced.
– FR Light Material.
– Standard – Self Illum.
Brazil:
– Brazil Advanced Material.
– Standard – Self Illum.
– Select Lights and Material:
It shows all the lights and self emitting materials on the current scene, and here is were you select the lights and/or materials that you would like to include in a presets.
– ![]() It will collapse or expand the tree view
It will collapse or expand the tree view
– ![]() When clicking on lights or materials on the tree view, objects and lights on the viewport can be selected just to make sure it’s what you want, this applies to both the select and presets sections. However on large projects selecting and deselecting objects all the time becomes slow, if that is the case just uncheck this and they will not be selected.
When clicking on lights or materials on the tree view, objects and lights on the viewport can be selected just to make sure it’s what you want, this applies to both the select and presets sections. However on large projects selecting and deselecting objects all the time becomes slow, if that is the case just uncheck this and they will not be selected.
– ![]() Clicking here will add all Lights and materials to the presets, lights that are instances will be add it as a single preset.
Clicking here will add all Lights and materials to the presets, lights that are instances will be add it as a single preset.
– ![]() Add the selected lights and/or materials to a preset. You will be presented with a dialog asking for the name of the preset. Make sure that name is unique.
Add the selected lights and/or materials to a preset. You will be presented with a dialog asking for the name of the preset. Make sure that name is unique.
– ![]() remove the selected preset.
remove the selected preset.
– ![]() Clear the selection in the tree view.
Clear the selection in the tree view.
– ![]() Let’s you open a preset list from a file.
Let’s you open a preset list from a file.
– ![]() Let’s you save the Presets list to a file
Let’s you save the Presets list to a file
– ![]() Checking this will display on the listener all the objects that are on the currently selected preset.
Checking this will display on the listener all the objects that are on the currently selected preset.
– ![]() Select were you want to save the files.
Select were you want to save the files.
– ![]()
it will open this dialog first:

where you can set the Animation Range and Format for rendering.
you can choose either HDRI or EXR for the format.
When you click OK, the HDRI´s images will be render it or summited to the network.
– ![]() It will show the following dialog.
It will show the following dialog. ![]()
– Priority: Submitted Job Priority.
– Suspended: Summit the Job suspended.
And then it will connect to the server. Once it’s connected you can click render to summit the images to the farm.
– ![]() This tells the script to work on the entire scene or the selected objects.
This tells the script to work on the entire scene or the selected objects.
This can be handy when you have a big project and are not well organized, that is the lights don’t have a meaningful name.
You can select the light on the viewport and they will show on the tree view so you can add them to a preset.
– ![]() Open a saved composition.
Open a saved composition.
– ![]() Save the current composition, it will ask you for a name and location.
Save the current composition, it will ask you for a name and location.
The composition will be saved with the animation if it has.
– ![]() Select all the hdri files you wish to include in the composition. Ctrl + Click to select multiple files.
Select all the hdri files you wish to include in the composition. Ctrl + Click to select multiple files.
– ![]() Check it if you have animated something and you want to see it interactively in both the preview and all the parameters.
Check it if you have animated something and you want to see it interactively in both the preview and all the parameters.
– ![]() Show the current composition preview window. IMPORTANT: Displaying a high resolution preview will be very slow!!!, try using low resolution for the preview.
Show the current composition preview window. IMPORTANT: Displaying a high resolution preview will be very slow!!!, try using low resolution for the preview.
– ![]() Pressing this button will render the current frame of the composition in case you want to save just one single frame.
Pressing this button will render the current frame of the composition in case you want to save just one single frame.
– ![]() Set the size of the composition: by default it’s the size of the original hdri file.
Set the size of the composition: by default it’s the size of the original hdri file.
This will also be the final resolution, so remember to put it back to 100%
– ![]() Lock the aspect ratio of the size spinners to the original image.
Lock the aspect ratio of the size spinners to the original image.
– ![]() Set the resolution of the preview to that percentage of the original image. I highly recommend using the lowest resolution you can to make it faster.
Set the resolution of the preview to that percentage of the original image. I highly recommend using the lowest resolution you can to make it faster.
Image Adjustments:

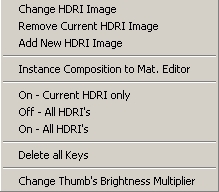
– Right Clicking on any thumbs brings this dialog:

– Change HDRI Image: Swap the currently clicked hdri for another one. Any animation on the current hdri will be lost!.
– Remove Current HDRI Image: Self explanatory.
– Add New HDRI Image: Self explanatory.
– Instance Composition to material Editor: It will make an instance of the composition the material editor, in case you want to do something else to it.
Also it’s required if you want to adjust the keys on the curve editor.
– ON- Current HDRY Only: it will turn off all other hdri images.
– OFF all HDRI’s: Self explanatory.
– On all HDRI’s: Self explanatory.
– Delete all Keys: Delete all animation keys of the composition.
– Change Thumbs Brightness:
Sometimes the hdri’s are too dark as they might have only
one light on for the complete scene, if you want to see it more clearly
you can change this multiplier to brighten the thumbs.
All the following parameters are animatable.
– on/off: Self explanatory.
– Opacity: Changes the transparency of the current HDRI.
– Multiplier: Change the multiplier of the current HDRI.
– Gamma: Change the gamma of the current HDRI.
– Hue: Change the hue of the current HDRI. The hue can be changed with the spinner or by dragging on the gray line under the spinners.
– Sat: Change the Saturation of the current HDRI.
– Tint: Change the Tint Color of the current HDRI.
– Tint Spinner: Change the Tint Color Multiplier of the current HDRI
– Render Path: Choose the location were you want to save the images.
– Render: Render the current composition.
– Net Render: It will show the following dialog. 
– Priority: Submitted Job Priority.
– Suspended: Summit the Job suspended.
And then it will connect to the server. Once it’s connected you can click render to summit the images to the farm
– ![]() here you can select the prefix for the render images, the format and the animation range.
here you can select the prefix for the render images, the format and the animation range.
multi_com_settings
Export the composition to java Processing
In order to use this functionality you must have previously installed Java Processing
you don’t really need to know anything about Processing but you must have it installed to be able to export the multilight composition to either the web or to a stand alone application.
the script creates the processing code with the folders and files need it. please look at the following video for a demonstration.
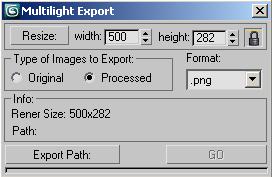
– ![]() Click to open the options for exporting the composition to Java.
Click to open the options for exporting the composition to Java.

Resize:
Click to have the images resized to the specified dimensions. i do recommend using low resolution as everything its been calculated on the user computer, so if you have several large images its going to be real slow.
Type of Images to Export:
here you choose if you want to use the original images or the ones already processed on the script.
Format:
Image format for export.
Export Path:
Where you want the images and processing code to be saved.


Leave a reply