Platform: Win64
Changes:
ver 1.01 : – Progress information during glare calculations.
– use Custom HDR Images as Filters.
ver 1.00 : initial release.
Reference:
Physically-Based Glare Effects for Digital Images. by Spencer, Shirley, Zimmerman, Greenberg. SIGGRAPH 95
High Dynamic Range Imaging
Fundamentals of Computer Graphics
Physically Based Rendering
Known issues:
What is it:
Glare is a program to generate physical accurate glare/bloom for 3d renders or high dynamic images.
As a 3d artists we are most of the time trying to make our renders look as real as possible, one area which even do seems easy but is not, is to represent our image bright areas.
We must make believe the viewer that he/she is looking at something that is much brighter than what really is, at list on the image.
One way to achieve that is to add glare/bloom to the image, and that is where this program can help us.
The program is going to look at the bright pixels which the user specifies and add glare to those areas. After the glare is calculated we can change some parameters interactively like the intensity, gamma of the glare layer and add some image effects like sharpening, vignetting and chromatic aberrations.
finally we can save the complete image (original image + glare) or save the glare layer alone for later composition perhaps in after effects or other composition program.
videos:
Description
following are descriptions of all parameters of glare.
Read Formats: exr, hdr, png, jpg, bmp.
Write Formats: exr, hdr, tga, png, jpg, bmp
i highly recommend using one of the high dynamic formats since all the process are done in high dynamic and saving in a low dynamic format would lose a lot of pixel information.
Navigation
Mouse
- Pan: Hold the Left mouse button down and pan.
- Zoom: Mouse wheel
- Zoom 100%: Right click mouse.
- Zoom fit view: Click middle mouse button.
Keyboard
- Zoom: + , –
- Zoom 100%: a
- Zoom fit view: f
Physical Glare
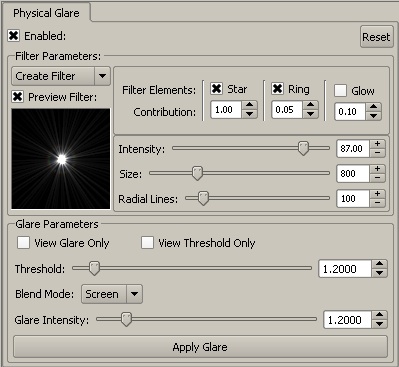
Enable: Enable the glare effect
Reset: Set all the parameters to their default value.
Filter Parameters
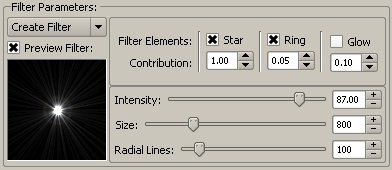
Create Filter: The glare filter will be randomly calculated
Load Filter: Load an hdr image to use as a filter, the images must have the same width and height.
Preview Filter: Allows you to see a small preview of the generated filter.
Filter Elements: this applies only when creating the filter automatically, Here you have the option to enable/disable the tree different elements of the filter (star, ring and glow) you can also specify the amount each contributes to each other.
The glow is disable by default since you already get some glow by the star element since there are many straight lines that make up the start and at the center you get some glow. but you still have the option to add more, or perhaps only use glow with out starts.
Intensity: Controls how intense the glare is per pixel.
– Lower Numbers Make the Glare look Smaller, or that it spreads less.
– Larger Numbers Make the Glare look Bigger, or that it spreads More.
Size: This is the filter size in pixels, it has a huge impact on the calculation time. Ideally this would be the same size as the largest size of the image, but that some times would be to large to calculate in a reasonable time, so I would suggest leaving the default size and if you can see the filter rectangle around bright areas then increase the size. for the example.
Size 100 pixels Size 1000 pixels


The brightness was exagerated to show the effect
Radial Lines: Number of lines drawn to form the star. for the example.
14 Lines 300 Lines
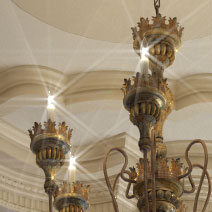

Glare Parameters
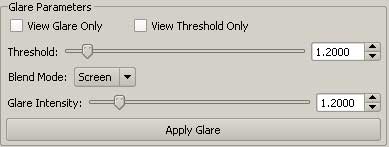
View Glare Only: This will show you only the glare layer, once its calculated. In batch mode if this is checked only the glare layer will be saved.
View Threshold Only: Use this to visualize the areas that will get affected by glare.
Threshold: Set the minimum pixel intensity value that will be used to calculate the glare.
Blend Mode: You have the option to use either screen or add to blend the original image and the glare image. this only gets used when saving the complete image (original image + glare).
Glare Intensity: Control the intensity of the glare layer over the original image. this only gets used when saving the complete image (original image + glare).
Apply Glare: Starts the calculation of glare.
Image Effects
Glare Levels: Adjust the gamma of the glare layer only. this only gets used when saving the complete image (original image + glare).

Sharpening: Apply simple sharpening to the image. this only gets used when saving the complete image (original image + glare).

Active: Enable sharpening.
Amount: Amount of sharpening.
Vignetting: Add vignetting effect to the image. this only gets used when saving the complete image (original image + glare).

Active: Enable Vignetting.
Interior: Interior Radius of the vignetting start.
Exterior: Exterior radius of the vignetting end.
Chromatic Aberration: add Chromatic Aberration effect to the image. this only gets used when saving the complete image (original image + glare).

Active: Enable Chromatic Aberrations.
Blue/Green/Red — Blue/Yellow — Cyan/Red: the mode used for the effect.
Amount: Amount of chromatic aberration add it.
Batch
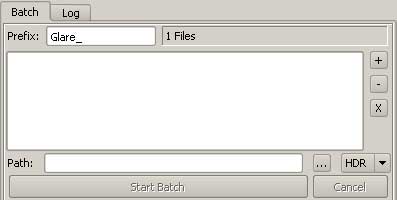
Glare allows you batch process any number of images. You can add, remove files here. when you open a file its automatically add it to the list. the files do not have to be the same size.
Prefix: The name that will get add it to the original file name. example. theRender001.exr -> Glare_theRender001.exr
list: You can double click on the list to open a file.
![]() = Add files to the list.
= Add files to the list.
![]() = Remove the selected file from the list.
= Remove the selected file from the list.
![]() = Remove all files from the list.
= Remove all files from the list.
path = The location where all the files will get saved.
![]() = click to set the path with a browser.
= click to set the path with a browser.
![]()
Format: The format required for saving the files. if you are compositing the glare in an external application(after effects) I recommend to chose a high dynamic format (exr or hdr).
![]()
Start Batch: Start the batch process.
![]()
Cancel: Cancel the batch process.
Log: Any issues with it a file will be shown here.
Tips
Control Glare/Bloom Size:
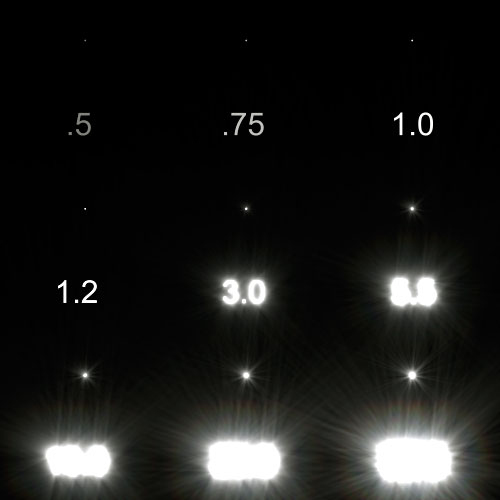
You can control the size of the glare by applying different intensity for you materials, depending on how large or small you might wanted it.
Don’t be afraid to go as high as 100.0 for the pixel value. if you start to get strange artifacts for example in vray you can just exclude it from gi.
in the following image you can see the effect glare has with different pixel intensities.
Purchase
Disclaimer:
Please Read this Disclaimer Before Buying the Program.
The Program has been in constant development since April 2009 and will probably continue to be, while it has been successfully used it in many projects with out any issues, unfortunately I can not warranty it will be 100% bug free.
I will do my best to make sure the software is working as it should. plus Because of the various hardware and software environments into which this software may be put, the software and the accompanying files are provided “As is” and without any warranties as to performance, function or any other warranties whether expressed or implied.
The program should be thoroughly tested with non-critical data before relying on it. The user must assume the entire risk of using the program.
The author shall have neither liability nor responsibility to any person or entity with respect to any liability, loss, or damage directly or indirectly arising from the use of or inability to use the software or the results of the analyses provided by the software.
If you do not agree to the terms of this agreement, Please do not buy/use the software.
Returns policy
Before buying Glare, you must be sure of it and you must know that our return policy is clear: we do not give refunds.
Version 1.00 is $50.00 USD.
Please make sure you select the correct Platform(win32, win64 or Mac OSX 10.6)
Once I have receive your payment confirmation from paypal I will send by email the purchased program.
Order Processing is usually between 24 and 48 hours.




Leave a reply